HUSQVARNA® VIKING® Yarn Embellishment Foot Set

sku 920403096
Out of Stock
£64.00 MSRP

Includes VAT

With the HUSQVARNA® VIKING® Yarn Embellishment Foot Set, you can easily create decorative yarn embellishment when sewing.

Free standard shipping on orders over £60.00. VAT included in price.

Details
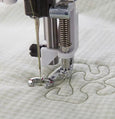
With the HUSQVARNA® VIKING® Yarn Embellishment Foot Set, you can easily create decorative yarn embellishment when sewing. The embellishment is created when sewing using the specially designed stitches for this foot together with yarn. The effect of the embellishment can be changed dramatically by using the different types of yarn. 
The presser foot is designed to be used with specially designed stitches. These stitches can be downloaded at www. husqvarnaviking.com.

Note: No stitches except for the specially designed stitches can be used.
The yarn foot is equipped with an adjustment wheel. The wheel is used to fine tune the red line so that it matches the center needle position on the foot.

When the needle is centered at the redline, it is more likely that the yarn foot will pick up a wider range of yarn.

Contents:

A. Yarn guides (for DESIGNER DIAMOND™ series, DESIGNER RUBY™ series, SAPPHIRE™ 960Q, except for DESIGNER™ SE)

B. Yarn guides (for DESIGNER™ SE and DESIGNER™ SE Limited Edition).

C. Yarn Foot

D. Yarn threader – Stitches to download

PREPARING THE MACHINE FOR COUCHING:

  1. Thread the machine with a thread that matches the decorative yarn or use transparent thread.
  2. Attach the yarn guides to your machine in the notches under the handle at the rear side of the machine.
  3. Pull out as much yarn as you need from the ball of yarn and place it as shown in. Make sure to pull out the yarn continuously to avoid too much strain on the yarn.
  4. Place the yarn in the yarn guides. It is very important that the yarn runs smoothly while you are sewing.
  5. Thread the yarn from above through the hole in the Yarn foot using the yarn threader. We recommend using yarn with even thickness. For best result the yarn should fill the hole in the foot but still run easily through it.
  6. Snap the foot onto the machine.
  7. Select the stitch you want to sew. Before starting to sew, use the adjustment wheel to make sure the redline on the foot is matching the needle.

Tips: Draw a line on the fabric with a fabric marker, for easier guidance.

Note: Some yarn work better than other. Yarn with a looser structure will often give a better result. 
What's Included

Contents:

A. Yarn guides (for DESIGNER DIAMOND™ series, DESIGNER RUBY™ series, SAPPHIRE™ 960Q, except for DESIGNER™ SE)

B. Yarn guides (for DESIGNER™ SE and DESIGNER™ SE Limited Edition).

C. Yarn Foot

D. Yarn threader

Specifications

PREPARING THE MACHINE FOR COUCHING:

  1. Thread the machine with a thread that matches the decorative yarn or use transparent thread.
  2. Attach the yarn guides to your machine in the notches under the handle at the rear side of the machine.
  3. Pull out as much yarn as you need from the ball of yarn and place it as shown in. Make sure to pull out the yarn continuously to avoid too much strain on the yarn.
  4. Place the yarn in the yarn guides. It is very important that the yarn runs smoothly while you are sewing.
  5. Thread the yarn from above through the hole in the Yarn foot using the yarn threader. We recommend using yarn with even thickness. For best result the yarn should fill the hole in the foot but still run easily through it.
  6. Snap the foot onto the machine.
  7. Select the stitch you want to sew. Before starting to sew, use the adjustment wheel to make sure the redline on the foot is matching the needle.

Tips: Draw a line on the fabric with a fabric marker, for easier guidance.

Note: Some yarn work better than other. Yarn with a looser structure will often give a better result. 

Machine Compatibility